English
Agents
Agents support recurring tasks with a preconfigured model, system prompt, optional tools and their own knowledge base. In the agent selection, AISSIST distinguishes between Favourites, My Agents and Team Agents.
Finding and starting agents
Open Create and select the required team under Text. You can then filter agents by category (Fig. 1, no. 1), search for them (Fig. 1, no. 2) and sort them in different ways (Fig. 1, no. 3).
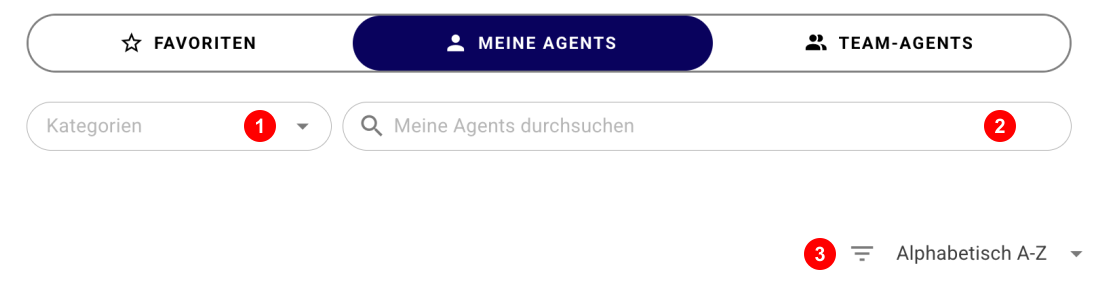
Figure 1: Categories, search and sorting in the agent selection.
Each agent card displays a title, short description and meta information. The icon in the top-right corner (Fig. 2, no. 1) indicates whether it is a personal or team agent. The information icon (Fig. 2, no. 2) provides further details about the agent. Use the star (Fig. 2, no. 3) to add an agent to your favourites or remove it again.
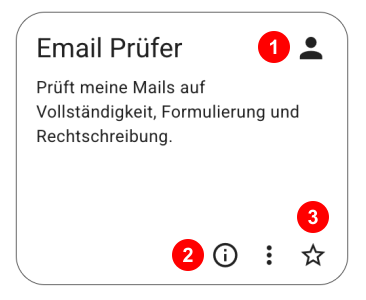
Figure 2: Email Checker agent card with agent type, information and favourite star.
Click an agent card to start the conversation. The meta information panel above the chat input shows the currently active agent (Fig. 3, no. 1) and its type (Fig. 3, no. 2). This makes it clear which agent is in use even across longer or multiple sessions.
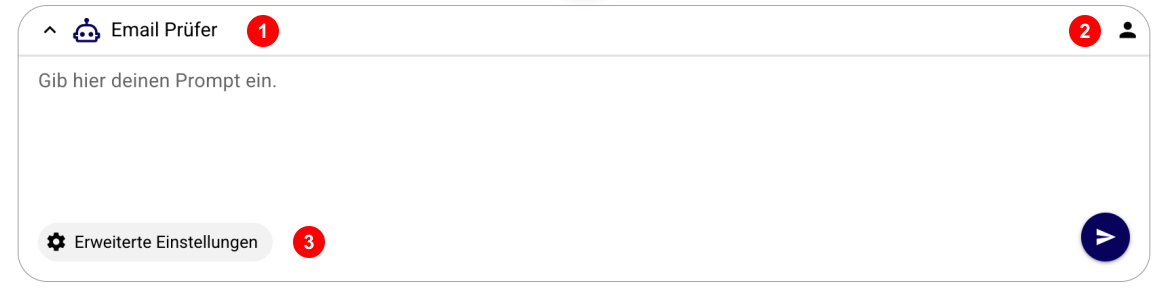
Figure 3: Active agent and agent type above the chat input, with access to advanced settings.
Use Advanced Settings (Fig. 3, no. 3) to open the additional view. In the open view, Advanced Settings (Fig. 4, no. 1) is highlighted; below it, you can view the agent's System Prompt (Fig. 4, no. 2).
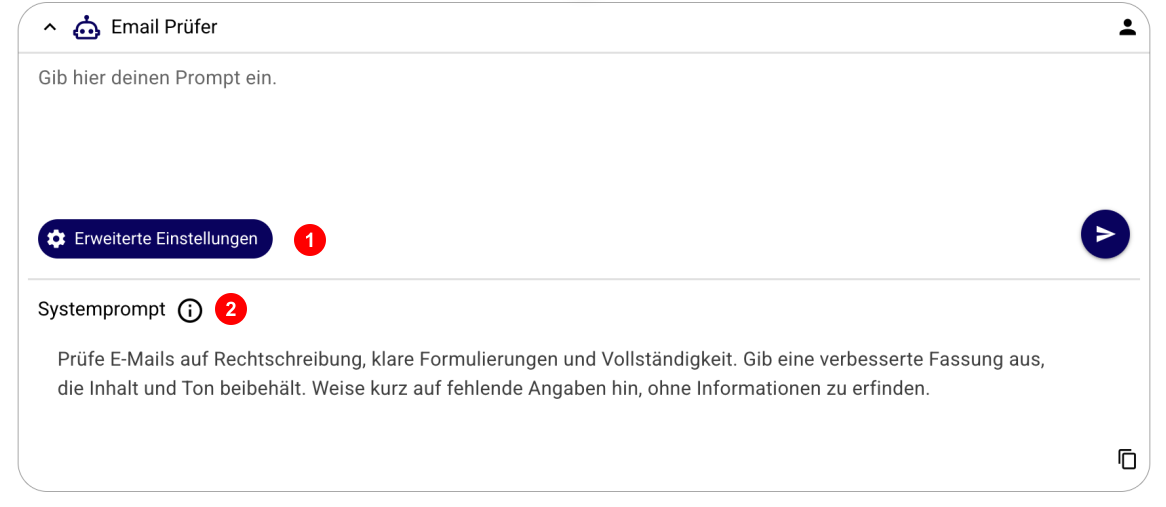
Figure 4: Open advanced settings with the Email Checker's system prompt.
Sections in the agent selection
- Favourites (Fig. 5, no. 1) contains agents you marked with the star. It is your personal quick-access list, can contain personal and team agents, and is synchronised across all teams.
- My Agents (Fig. 5, no. 2) contains your personal agents. Here you can create them and manage them using the three-dot menu.
- Team Agents (Fig. 5, no. 3) contains agents provided for your team. They are maintained centrally and can only be edited with the appropriate administrator or manager permission.
Categories provide an additional subject-based classification within the agent list. Use the category filter to display only agents for a particular area of use, for example. Categories are not the same as the Favourites, My Agents and Team Agents sections.
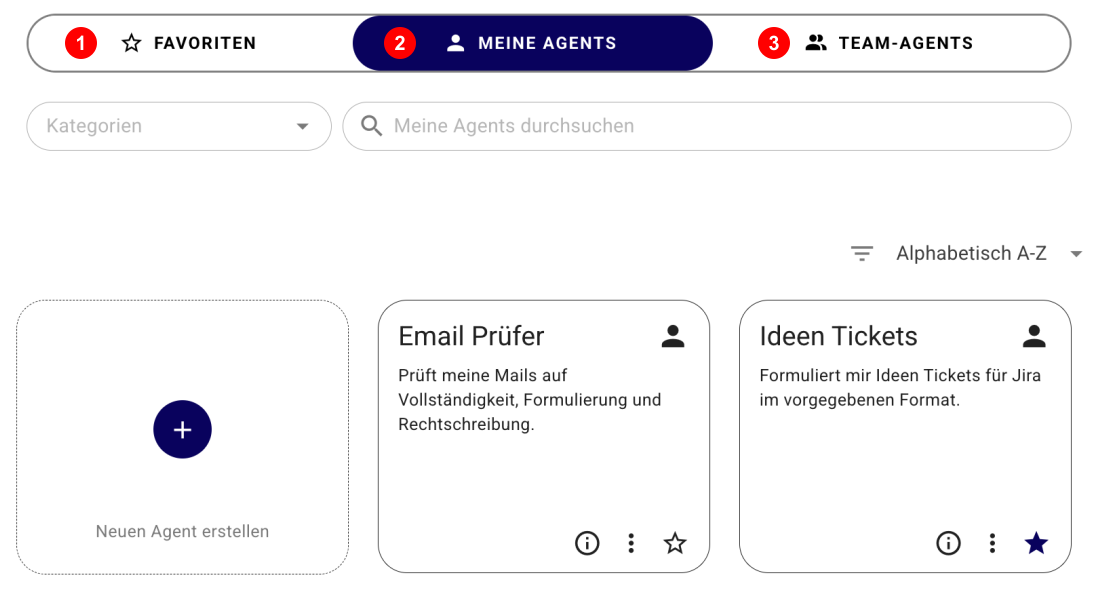
Figure 5: The Favourites, My Agents and Team Agents sections.
Personal agents
You can manage your own agents under My Agents. They are visible and available only to you.
To create a personal agent:
- Select Create New Agent (Fig. 6, no. 1).
- Enter a title and, optionally, a description.
- Select the model and reasoning level.
- Add a system prompt and opening message.
- Add documents, tools and categories if required.
- Save the agent.
- Use preview mode in the panel on the right. See the “Preview mode” section.
Use the three-dot menu (Fig. 6, no. 2) on a personal agent card to edit (Fig. 6, no. 3), duplicate (Fig. 6, no. 4) or delete (Fig. 6, no. 5) the agent. Duplicating creates an independent copy that you can adapt separately afterwards (documents are not duplicated).
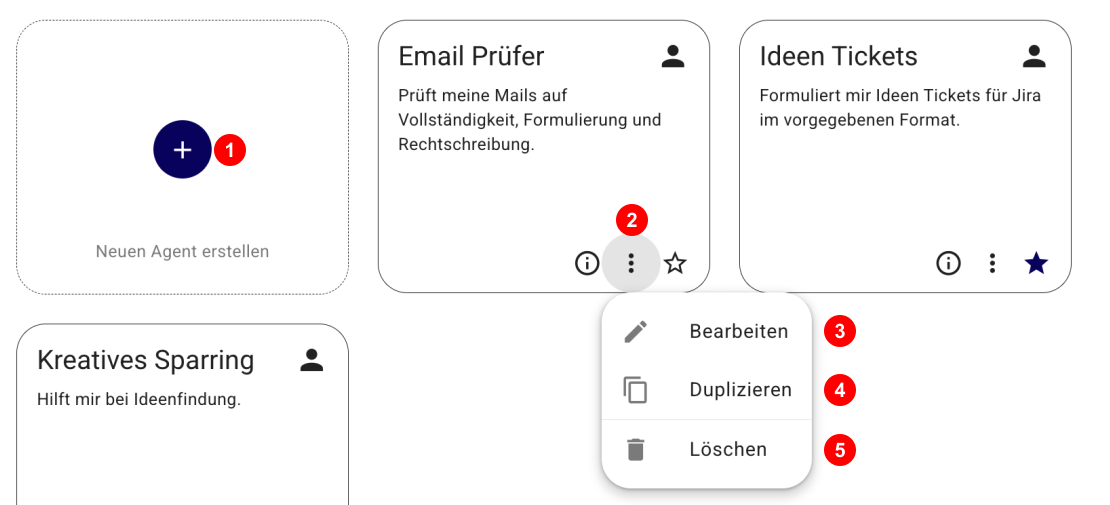
Figure 6: Create personal agents and manage them using the three-dot menu.
Opening the agent editor
Find the editor for a personal agent under Create → Text → Select Agents Team → My Agents. Select Create New Agent, or open the three-dot menu for an existing agent card and select Edit.
In the editor, you determine how your agent is displayed and works:
- Title (Fig. 7, no. 1): The name under which the agent is displayed.
- Agent Description (Fig. 7, no. 2): A short description of its task so that you recognise it in the selection.
- Model Selection (Fig. 7, no. 3): The model the agent uses for its task.
- Reasoning (Fig. 7, no. 4): How intensively the model should reason about the task before responding.
- System Prompt (Fig. 7, no. 5): The basic instructions for the agent's role, behaviour and way of working.
- Opening Message (Fig. 7, no. 6): The message passed to the agent directly when the conversation starts.
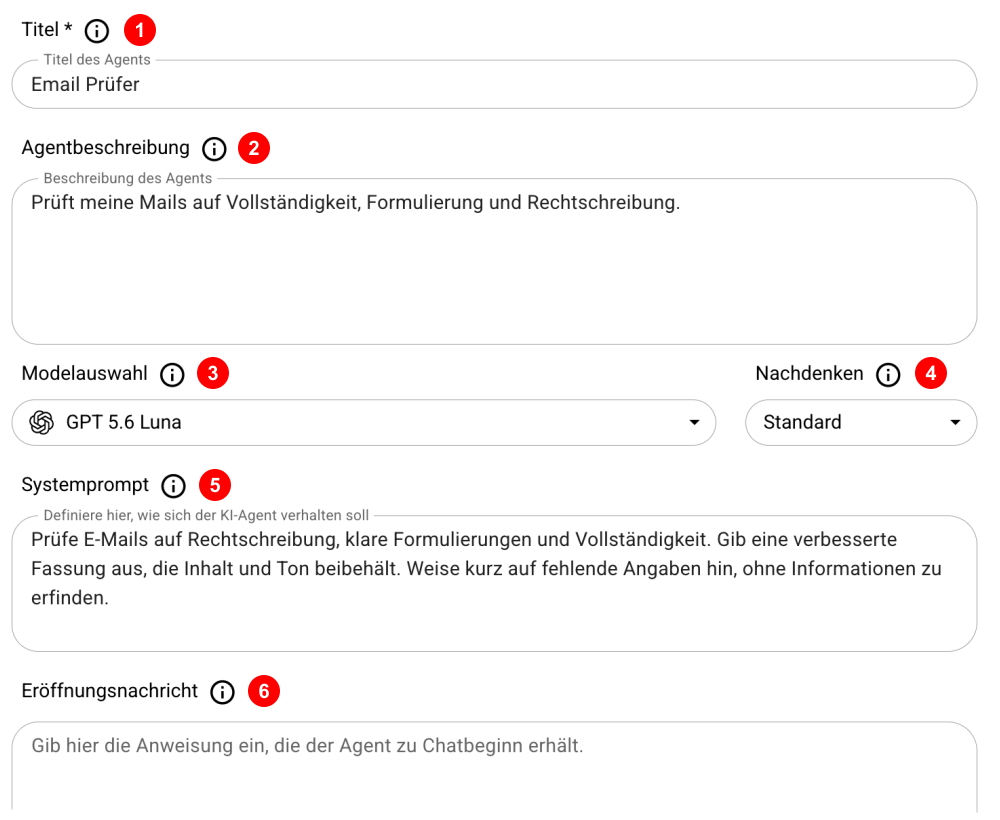
Figure 7: Configuration fields in the Email Checker agent editor.
Preview mode
The agent editor has a preview pane on the right (Fig. 8, no. 1). Select Save (Fig. 8, no. 2) to apply the configuration. A new agent must be saved before it can be tested there. The editor combines the configuration on the left with a testable chat on the right, without requiring you to return to the agent overview. Changes to your agent must likewise be saved before you can test them.
Use the reset icon (Fig. 8, no. 3) in the top-right corner of the preview pane to reset the preview chat. This lets you start a new test without the preceding conversation history.
Note: Chats in preview mode are not saved as sessions. Their conversation history is lost when you reset them or leave the agent editor.
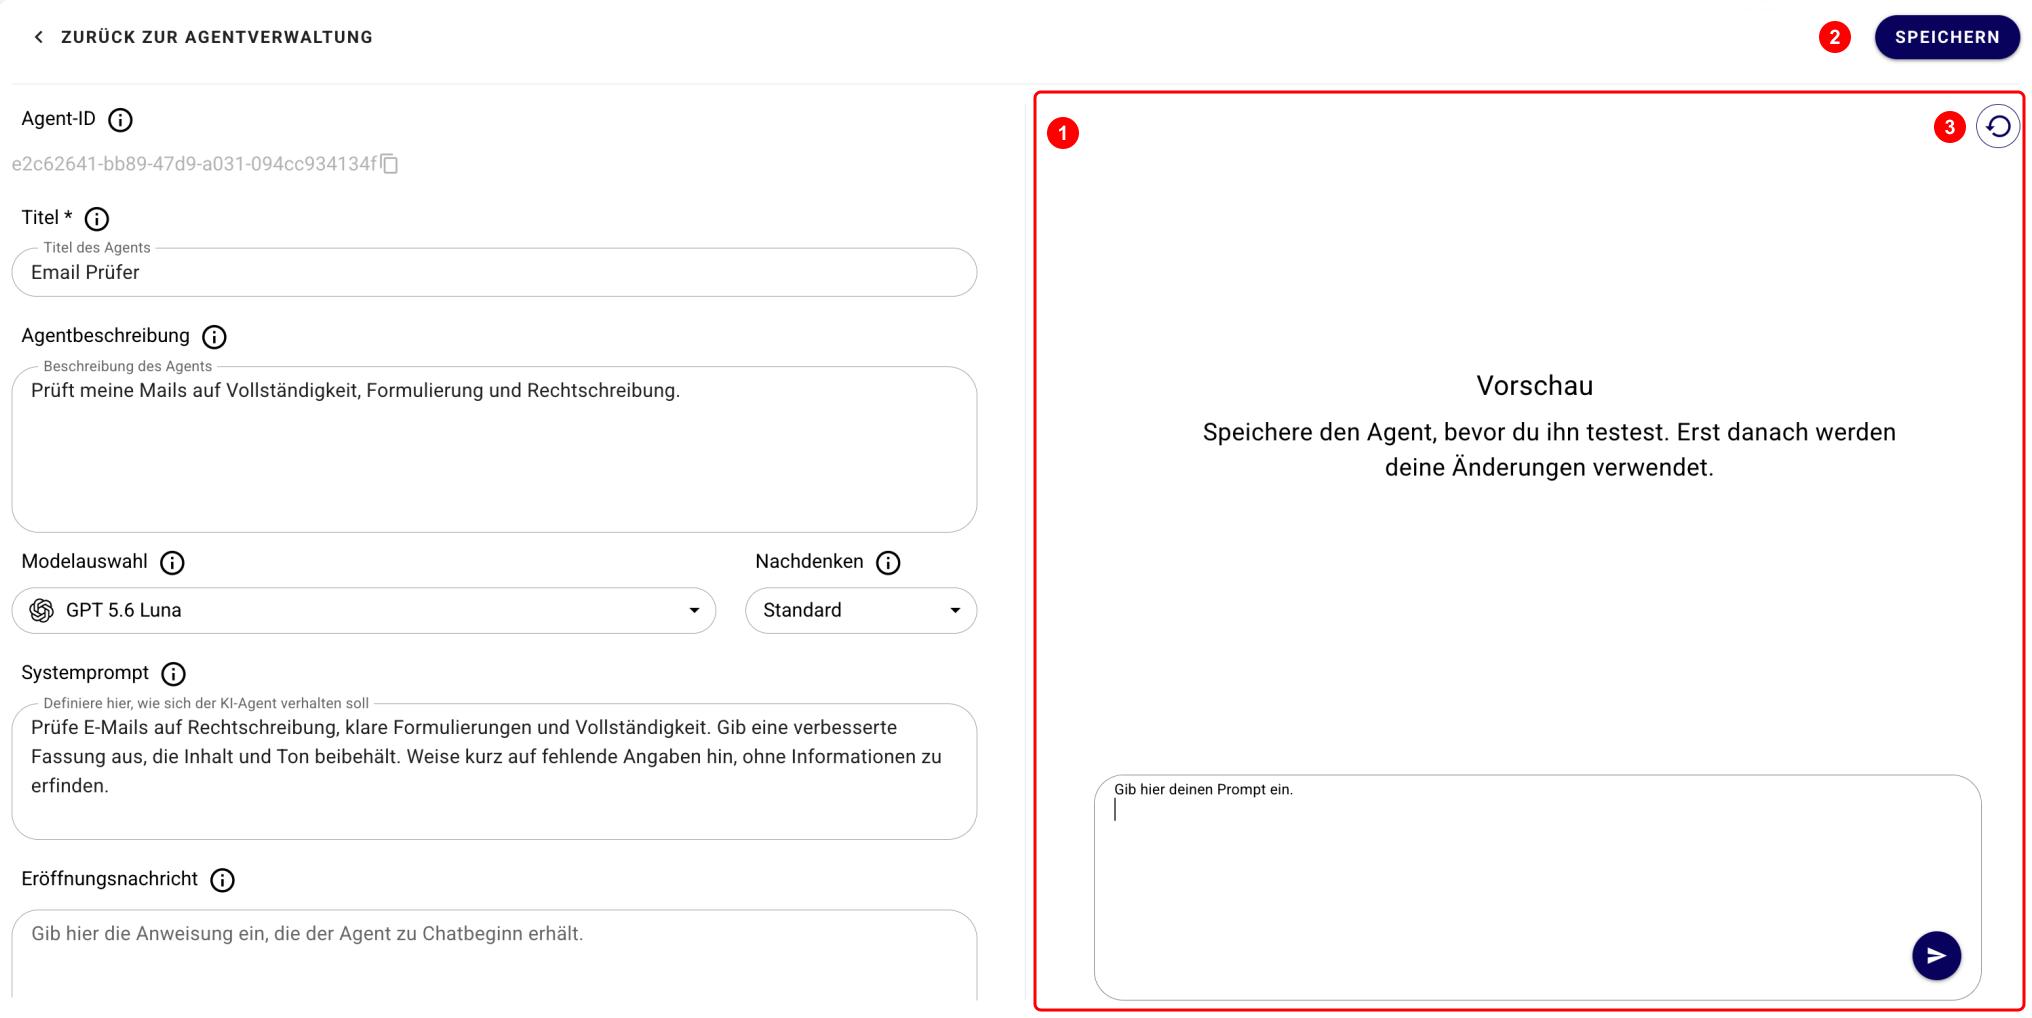
Figure 8: Chat preview outlined in red with Save button and reset icon.
Knowledge base
Under Upload Documents (Fig. 9, no. 1), you can store files as the agent's knowledge base. AISSIST supports up to ten documents with a maximum size of 50 MB each.
The currently available formats are:
- PDF, DOC and DOCX
- TXT, CSV, HTML, XHTML, JSON, Markdown (
.md), RTF and XML - Excel workbooks in XLSX format
- PowerPoint presentations in PPTX format
Drag files to the upload area or select them using Browse Files. Below that, select the agent's Tools (Fig. 9, no. 2) and Categories (Fig. 9, no. 3).
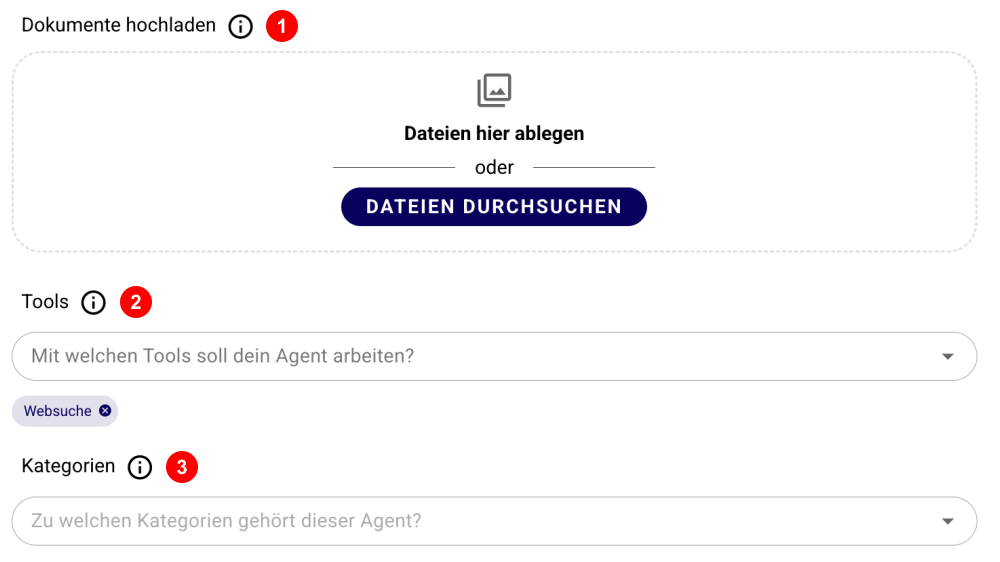
Figure 9: Upload documents as a knowledge base and select tools and categories.
Agent process
When an agent uses tools, the collapsible Agent Process section appears in its response (Fig. 10, no. 1). It displays the executed steps in chronological order, such as web searches and retrieving documents or document contents. The actual response remains separate from this. This allows you to trace how the agent arrived at its result.
The illustrated example shows the web search (Fig. 10, no. 2) and the subsequent retrieval of search results (Fig. 10, no. 3). Use the arrow in the heading to collapse the process again.
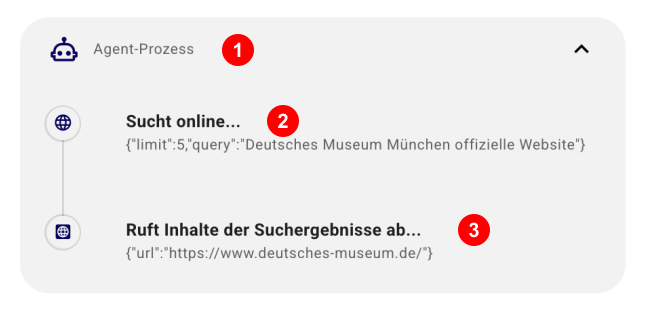
Figure 10: Open Agent Process with web search and retrieval of search results.